How to SSH into VirtualBox VM Using PuTTY for Mac

This article discusses setting up a virtual machine (VM) as a virtual private server (VPS) and accessing it using secure shell (SSH). This VM VPS can then be used to test configuration and software changes before deployment to a live VPS. A deployed VPS can usually be accessed using SSH, therefore using SSH into VPS running on a VM is good practice for a live situation. This test configuration should accurately reflect the live VPS, reducing mistakes when moving from test to production. This tutorial and guide shows how to set up a VirtualBox VM and access it via the SSH client PuTTY, replicating production world VPS access.

You should never test on live systems. Replicate the live system in a test environment. Use the test environment to try out new configurations and software. When happy with the changes deploy to the live system with confidence. Of course there is no guarantee that the changes to the live system will not cause problems. However, the chance of errors occurring is reduced. The test environment should be the same as the live systems so that changes have the same affect when deployed.

Using a VM is a good way to test a system without impacting a local machine. VirtualBox is a free application that can run VMs. This article uses VirtualBox to configure a VM as a test VPS.

A VPS running in the cloud can be replicated on a local machine using a VM. The first step is to create a local VM. Then on the local VM install the same OS as the one running on the live VPS.

Use Port Forwarding for the Test VPS Networking

By default port 22 is used for SSH, see a list of TCP and UDP port numbers in Wikipedia. VirtualBox can be configured to listen to a port on the host machine and forward any traffic for that port to a port on the VM. This is configured in the VM’s network settings.

To change the network settings the VM VPS must be powered off or suspended.  Or save the machine state with the VirtualBox VM window’s File then Close menu option.

With the VM highlighted in the VirtualBox Manager click the Settings icon or use the Machine menu and select Settings.

Under Network the Adapter 1 tab is selected, the default virtual network adapter enabled for the VM VPS. Click Advanced then click the Port Forwarding button On the Port Forwarding Rules dialog click the Adds new port forwarding rule icon. Give the new rule a name, e.g. ssh rule, the protocol will be TCP, Host IP address is blank. Choose a Host Port such as 2222, Guest IP is blank and Guest Port will be 22. Click OK to create the new rule.

Leaving the IP addresses blank means that if the host or guest IPs change then rule will still work. The host port should not be in use by another application or service (see the the Wikipedia list for common uses of ports). While 2222 is used by some products it is easy to remember as it is simply the default port 22 written twice. Use any valid port number in the range 1025 to 65535.

Install the PuTTY Terminal Emulator

The application PuTTY is a terminal emulation program, it implements Telnet, SSH and other network protocols. PuTTY can be used for remote connections to Windows or Unix type machines, such as a Linux based VPS.

Using PuTTY to SSH into VPS Running on a VM

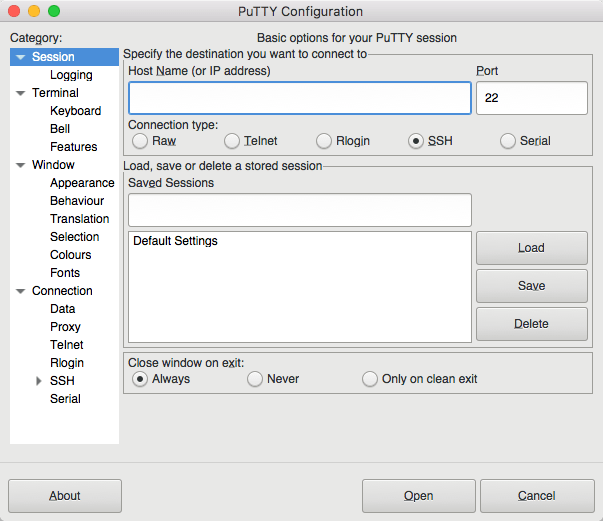
Open PuTTY, start a new session, the Hostname is localhost (your machine), which is the same as entering 127.0.0.1. The port is 2222, or whichever port number was set up in the port forwarding rule. Click the Open button.

The first time PuTTY connects to the VPS a security alert is shown. Confirm that the VPS is the valid by selecting Yes (it is running on the VM on the localhost). By selecting Yes the alert will not appear next time. A terminal window will appear and if everything is configured correctly the login prompt will be available. Log in as root with the password set during install. Run a command such as ls to list the files in the directory.

Typing logout will end the session and close the PuTTY window.

We now use FastSpring as our preferred storefront, you can pay with Credit / Debit Cards, PayPal, Amazon payments, Wire Transfer etc. etc. This store is very secure, simple and fast.

Purchase Putty 9.1.0 now and have Telnet SSH FTP SCP on your Mac made easy!

Connecting to Your AWS Linux Instance from MacOS Using PuTTY for Mac

Connecting to Your ( Amazon Elastic Compute Cloud ) AWS Linux Instance from MacOS Using PuTTY for Mac.

After you launch your instance, you can connect to it and use it the way that you’d use a computer sitting in front of you.

Note

After you launch an instance, it can take a few minutes for the instance to be ready so that you can connect to it. Check that your instance has passed its status checks – you can view this information in the Status Checks column on the Instances page.

The following instructions explain how to connect to your instance using PuTTY for Mac, a SSH client for Windows that has been ported to MacOS. If you receive an error while attempting to connect to your instance.

Prerequisites

Before you connect to your Linux instance using PuTTY, complete the following prerequisites:

  • Install PuTTY
    Download and install PuTTY from the PuTTY for Mac store. If you already have an older version of PuTTY for Mac installed, we recommend that you download the latest version. Be sure to install the entire suite.
  • Get the ID of the instance
    You can get the ID of your instance using the Amazon EC2 console (from the Instance ID column). If you prefer, you can use the describe-instances (AWS CLI) or Get-EC2Instance (AWS Tools for Windows PowerShell) command.
  • Get the public DNS name of the instance
    You can get the public DNS for your instance using the Amazon EC2 console (check the Public DNS (IPv4) column; if this column is hidden, choose the Show/Hide icon and select Public DNS (IPv4)). If you prefer, you can use the describe-instances (AWS CLI) or Get-EC2Instance (AWS Tools for Windows PowerShell) command.
  • (IPv6 only) Get the IPv6 address of the instance
    If you’ve assigned an IPv6 address to your instance, you can optionally connect to the instance using its IPv6 address instead of a public IPv4 address or public IPv4 DNS hostname. Your local computer must have an IPv6 address and must be configured to use IPv6. You can get the IPv6 address of your instance using the Amazon EC2 console (check the IPv6 IPs field). If you prefer, you can use the describe-instances (AWS CLI) or Get-EC2Instance (AWS Tools for Windows PowerShell) command. For more information about IPv6, see IPv6 Addresses.
  • Locate the private key
    Get the fully qualified path to the location on your computer of the .pem file for the key pair that you specified when you launched the instance.
  • Enable inbound SSH traffic from your IP address to your instance
    Ensure that the security group associated with your instance allows incoming SSH traffic from your IP address. The default security group does not allow incoming SSH traffic by default.

Starting a PuTTY Session

Use the following procedure to connect to your Linux instance using PuTTY. You need the .ppk file that you created for your private key. If you receive an error while attempting to connect to your instance, see Troubleshooting Connecting to Your Instance.

To start a PuTTY session
  1. (Optional) You can verify the RSA key fingerprint on your instance using the get-console-output (AWS CLI) command on your local system (not on the instance). This is useful if you’ve launched your instance from a public AMI from a third party. Locate the SSH HOST KEY FINGERPRINTS section, and note the RSA fingerprint (for example, 1f:51:ae:28:bf:89:e9:d8:1f:25:5d:37:2d:7d:b8:ca:9f:f5:f1:6f) and compare it to the fingerprint of the instance.
    Copy
    aws ec2 get-console-output --instance-id instance_id

    Here is an example of what you should look for:

    -----BEGIN SSH HOST KEY FINGERPRINTS-----
    ... 1f:51:ae:28:bf:89:e9:d8:1f:25:5d:37:2d:7d:b8:ca:9f:f5:f1:6f ...
    -----END SSH HOST KEY FINGERPRINTS-----

    Note that the SSH HOST KEY FINGERPRINTS section is only available after the first boot of the instance.

  2. Start PuTTY (from the Start menu, choose All Programs > PuTTY > PuTTY).
  3. In the Category pane, select Session and complete the following fields:
    1. In the Host Name box, enter user_name@public_dns_name. Be sure to specify the appropriate user name for your AMI. For example:
      • For an Amazon Linux AMI, the user name is ec2-user.
      • For a RHEL AMI, the user name is ec2-user or root.
      • For an Ubuntu AMI, the user name is ubuntu or root.
      • For a Centos AMI, the user name is centos.
      • For a Fedora AMI, the user name is ec2-user.
      • For SUSE, the user name is ec2-user or root.
      • Otherwise, if ec2-user and root don’t work, check with the AMI provider.
    2. (IPv6 only) To connect using your instance’s IPv6 address, enter user_name@ipv6_address. Be sure to specify the appropriate user name for your AMI. For example:
      • For an Amazon Linux AMI, the user name is ec2-user.
      • For a RHEL AMI, the user name is ec2-user or root.
      • For an Ubuntu AMI, the user name is ubuntu or root.
      • For a Centos AMI, the user name is centos.
      • For a Fedora AMI, the user name is ec2-user.
      • For SUSE, the user name is ec2-user or root.
      • Otherwise, if ec2-user and root don’t work, check with the AMI provider.
    3. Under Connection type, select SSH.
    4. Ensure that Port is 22.
    
       PuTTY configuration - Session
  4. In the Category pane, expand Connection, expand SSH, and then select Auth. Complete the following:
    1. Choose Browse.
    2. Select the .ppk file that you generated for your key pair, and then choose Open.
    3. (Optional) If you plan to start this session again later, you can save the session information for future use. Select Session in the Category tree, enter a name for the session in Saved Sessions, and then choose Save.
    4. Choose Open to start the PuTTY session.
    
       PuTTY configuration - Auth
  5. If this is the first time you have connected to this instance, PuTTY displays a security alert dialog box that asks whether you trust the host you are connecting to.
  6. (Optional) Verify that the fingerprint in the security alert dialog box matches the fingerprint that you previously obtained in step 1. If these fingerprints don’t match, someone might be attempting a “man-in-the-middle” attack. If they match, continue to the next step.
  7. Choose Yes. A window opens and you are connected to your instance.
    Note

    If you specified a passphrase when you converted your private key to PuTTY’s format, you must provide that passphrase when you log in to the instance.

Connecting to Your Linux Instance Using SSH

After you launch your instance, you can connect to it and use it the way that you’d use a computer sitting in front of you.

Note

After you launch an instance, it can take a few minutes for the instance to be ready so that you can connect to it. Check that your instance has passed its status checks – you can view this information in the Status Checks column on the Instances page.

The following instructions explain how to connect to your instance using an SSH client. If you receive an error while attempting to connect to your instance, see Troubleshooting Connecting to Your Instance.

Prerequisites

Before you connect to your Linux instance, complete the following prerequisites:

  • Install an SSH client
    Your Linux computer most likely includes an SSH client by default. You can check for an SSH client by typing ssh at the command line. If your computer doesn’t recognize the command, the OpenSSH project provides a free implementation of the full suite of SSH tools. For more information, see http://www.openssh.com.
  • Install the AWS CLI Tools
    (Optional) If you’re using a public AMI from a third party, you can use the command line tools to verify the fingerprint. For more information about installing the AWS CLI, see Getting Set Up in the AWS Command Line Interface User Guide.
  • Get the ID of the instance
    You can get the ID of your instance using the Amazon EC2 console (from the Instance ID column). If you prefer, you can use the describe-instances (AWS CLI) or Get-EC2Instance (AWS Tools for Windows PowerShell) command.
  • Get the public DNS name of the instance
    You can get the public DNS for your instance using the Amazon EC2 console (check the Public DNS (IPv4) column; if this column is hidden, choose the Show/Hide icon and select Public DNS (IPv4)). If you prefer, you can use the describe-instances (AWS CLI) or Get-EC2Instance (AWS Tools for Windows PowerShell) command.
  • (IPv6 only) Get the IPv6 address of the instance
    If you’ve assigned an IPv6 address to your instance, you can optionally connect to the instance using its IPv6 address instead of a public IPv4 address or public IPv4 DNS hostname. Your local computer must have an IPv6 address and must be configured to use IPv6. You can get the IPv6 address of your instance using the Amazon EC2 console (check the IPv6 IPs field). If you prefer, you can use the describe-instances (AWS CLI) or Get-EC2Instance (AWS Tools for Windows PowerShell) command. For more information about IPv6, see IPv6 Addresses.
  • Locate the private key
    Get the fully qualified path to the location on your computer of the .pem file for the key pair that you specified when you launched the instance.
  • Enable inbound SSH traffic from your IP address to your instance
    Ensure that the security group associated with your instance allows incoming SSH traffic from your IP address. The default security group does not allow incoming SSH traffic by default. For more information, see Authorizing Inbound Traffic for Your Linux Instances.

Purchase Putty 8.5.1 now and have Telnet SSH FTP SCP on your Mac made easy!

Q4Wine 1.3.2 has been released for Linux and Mac OSX

Q4Wine is a Qt GUI for Wine. It will help you manage wine prefixes and installed applications. It currently supported on Linux, FreeBSD and Mac OS X platforms.

Q4Wine was initially written by Alexey S. Malakhov aka John Brezerk. General idea comes from WineTools scripts which were initially written by Frank Hendriksen.

General features are:

  • Can export Qt color theme into wine colors settings;
  • Can easy work with different wine versions at same time;
  • Easy creating, deleting and managing prefixes (WINEPREFIX);
  • Easy controlling for wine process;
  • Autostart icons support;
  • Easy cd-image use;
  • You can extract icons from PE files (.exe .dll);
  • Easy backup and restore for managed prefixes;
  • Winetricks support;
  • And more: Explore it!;

Changelog for 1.3.2:

Fixed:

  • [regression, bisected] Icon information is not displayed correctly BUG-80;
  • Winetricks does not update BUG-77;
  • First startup wizard (quick mount profile): profile strings are initially empty if fuseiso is not installed BUG-81;
  • Download (latest) Winetricks from GitHub BUG-82;
  • Correct proxy-related environment variables in Winetricks plugin BUG-83;
  • Use env command in the command line to download Winetricks BUG-83;
  • Support proxy username/password in Winetricks plugin BUG-83;
  • Treat aarch64 as 64 bit platform and put libraries in lib64 directory BUG-85;

You can now purchase PuTTY for Mac in our new online store.